What is WakeIT?
WakeIT allows you to register your computer(s) in the system so that you can wake them up remotely. Once woken up, if it is configured to allow you, you can connect to them to access your data and run your software, for example, via Remote Desktop.
How do I use WakeIT?
Go to the WakeIT website from the computer you would like to be able to wake up. Once there, click 'Register this computer', and when asked, enter an easy to remember name for the computer. That's it!
As long as the computer is configured corectly, which it should already be if you are using the Windows 7 Centrally Managed Desktop (see below for technical information for non-managed computers), nothing else should need to be done.
You can now wake this PC up on demand from the WakeIT website.
However, please test to make sure it works as you expect it to once you have registered your computer.
Why do we need WakeIT?
Using this tool means that you can still work remotely, in the same you do now, but when your computer is not being used, it can be put to sleep and help reduce its energy usage.
How do you know if my computer is awake?
We send a request to the computer to respond, commonly called a 'ping' but formally known as ICMP echo. If the computer responds, it is awake. If it does not, it is either asleep (or off), or the computer is configured to not respond to this type of request.
What do the different colours of the buttons mean?
Configuration Information
If you have a centrally managed Windows 7 PC, then all the settings that are required for this system should already be configured correctly.
If you do not, please read on for instructions on what needs to be configured.
Technical Information
For WakeIT Tool to work properly, the following things need to be switched on for the computers registered:- Wake on LAN
- Ping Response
If you have a Windows 7 Centrally Managed Desktop these settings should be set correctly automatically (other managed desktops may also automatically set some or all of the settings). However, if you do not, or the website does not work correctly, these settings need to be set as stated below. If you cannot change these settings, please submit a job to have this done by our IT support team.
Once you have registered your computer in this system, please put it to sleep and try and wake it up from a nearby computer to check it is correctly configured. If it is not, and you try to use this from off campus and it does not wake up, IT will be unable to do this for you (as the methods they might use rely on the system being configured in the same way).
Wake on LAN
Wake on LAN needs to be switched on in the BIOS of the computer and within Windows (or within the OS it is running) Here are some settings that need to be on. Please note that this list is not exhaustive: different hardware manufacturers have different settings or different names for settings.
BIOS Settings
- Deep Sleep: Disabled (Deep sleep disables the NIC whilst the computer is off/asleep/hibernating)
- Wake on LAN: On (Also listed as 'LAN Only' or 'LAN with PXE boot'. Both are okay)
Windows Settings
- NIC Settings: Advanced: Wake on Magic Packet: Enabled
- NIC Settings: Advanced: Wake on Directed Packet: Disabled (or it will wake when any traffic is sent to it)
- NIC Settings: Advanced: Enable PME: Enabled
- NIC Settings: Power Management: Allow this device to wake the computer: On
- NIC Settings: Power Management: Only allow a magic packet to wake the computer: On
Ping Response
Your computer needs to be able to respond to ping (ICMP echo) requests from University of Manchester IP addresses (130.88.*.*) to allow the site to determine the sleep status of the computer.Unusual Network Configuration
Some areas of the University have a different network configuration to the rest of campus. If your computer is in one of these locations then some extra information is needed. This information is your 'Subnet Mask', and is an optional piece of information to enter when registering your computer (to add this information, click 'Advanced' when registering your computer).
If you do not know this, it can be found in Windows:- Click the Start button
- In the Search box, type 'cmd' (without quotes) and press Enter
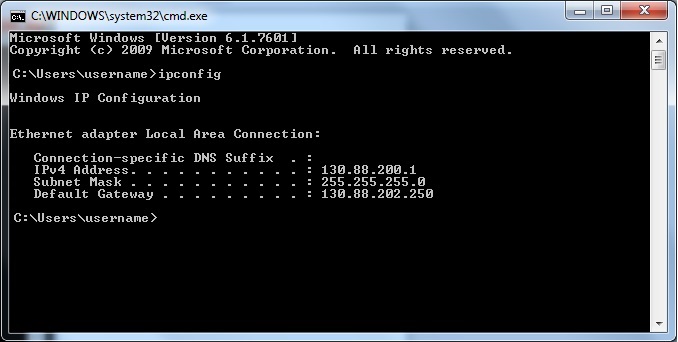
- In the command prompt windows that appears, type 'ipconfig' (without quotes) and press Enter
- In the information displayed, under the heading of 'Ethernet adapter Local Area Connection' (you may need to scroll up to see this), you will see an entry of 'Subnet Mask'. See below for an example screenshot of this. Enter this when registering the computer.
If you find you are unable to wake up your computer, try looking up this information. If it is '255.255.255.0', then this is probably not causing your issue. If your network mask is anything other than this value, then it must be entered when registering your computer for it to be able to wake up.
Subnet mask screenshot:


